I met Jim Lee at the PhotoPlus Expo in New York City last October. Jim was demonstrating his invention, the BRNO baLens Lens Cap. This clever gadget combines a custom white balance tool with a lens cap. The practical offshoot of this combo is that you have one less bit of kit to have to haul around in your camera bag.
White balance refers to the color of the light being used to illuminate the subject. Even though the light may look white to our eyes, it may have a color cast to it ranging across the entire visible spectrum (and a little bit beyond depending on the camera used). The color of the light is referred to as the color temperature and is expressed as a numeric value in degrees Kelvin.
In the world of film, this is handled by the chemistry of the film used - daylight film for general use, tungsten film for studio lights, IR/UV film for special purposes.
In the digital world, a special sensor in the camera tries to determine the color of the light being used. Modern DSLRs have vastly improved Auto White Balance (AWB) sensors but they are not perfect and can be fooled by mixed lighting environments. Modern DSLRs also provide several preset white balance settings as well as a method to input color temperatures (in degrees Kelvin) directly or to take a custom measurement before shooting.
However, if one is shooting in RAW mode (and you should be), RAW conversion software will allow to make white balance corrections easily afterwards. The only time this does not work is if the target has no white/gray/black on them for the software to get a reading. In this case, one must take a custom white balance reading by using a white/gray card and taking a test shot.
So now we have two schools of thought on this matter:
* Shoot AWB and fix in post.
* Shoot with custom white balance and get it right in the camera (mostly).
On the surface, the "Fix it in post" school of thought seems to be the logical choice except in those cases where there is no white/gray/black to take a reading off of.
Or is it?
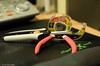
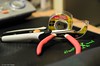
Above you see three photos. Actually, there are two photos, the middle photo is a copy of the left one.
Shot Specs:
* Nikon D300
* CV Nokton 58mm f/1.4 SL II lens
* 1/13s
* f/2.8
* ISO 1600
* Recorded as lossless compressed NEFs
* Illumination provided by two (2) Ikea Kvart reading lamps w/R-25 warm fluorescent bulbs
Post Processing
* Mac Pro 2.8 GHz w/12GB RAM used for post processing.
* Mac OS X Leopard 10.5.6
* Nvidia 8800GT + Dell WFP3007 30" Display
* Calibrated using Spyder3Studio
* Processed with Apple Aperture 2.1.2 64-bit
* Default Sharpening/NR
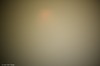
The photo on the left was shot using the D300's AWB sensor. The center photo is the same shot with WB adjusted in Aperture 2. The photo on the right was shot with a custom white balance calculated by pointing the camera with baLENS cap mounted on the lens directly at the light source and taking a reading. The image below shows you what the camera saw when it took the reading.
The following table summarizes the final white balance temperatures calculated by each method:
Method
Temperature
Tint
Auto White Balance
3099K
8
Post WB Adjust
2954K
27
baLens Custom WB
3024K
20
* As you can see from the data, the D300's AWB sensor leaned towards the cooler temps with tint slightly favoring magenta.
* Adjusting the image in post using Aperture's WB selector tool yields temps about 150K warmer with tint more heavily leaning towards magenta - cooling the image overall.
* The baLens shot is only 75K warmer that the AWB shot, but it too, favored a heavier magenta tint cooling the overall image but not as much as Aperture did.
[EDITOR'S NOTE: The terms "cooler" and "warmer" can be a little confusing with regards to color temperature. "Cool" light tends to have more blue in it and thus has a higher color temperature - blue being physically hotter. "Warm" light leans towards the red end of the spectrum and has a lower color temperature - red-hot is cooler than blue-hot.]
So which method is best? That is entirely up to you and what you are trying to accomplish. Based on my little unscientific test above, the baLens will deliver a result that falls between the reading given by the camera's AWB sensor and the RAW converter's WB algorithms. Factors that can affect this result include: clouds, lens used, RAW converter used, and camera's AWB sensor. YMMV.
I found the output from the baLens to most closely resemble the scene I shot. I personally favor the cooler lighting of the Post AWB shot, but in this case the baLens shot was most accurate. For event photographers, that means dozens, if not hundreds of hours saved in front of the computer.
From a convenience standpoint, the BRNO baLens is brilliant. Snap it on instead of your regular lens cap and you never have to worry about bringing the white balance tool or the gray card again. The baLens ships with two inserts: the standard one used here and a warmer one if you prefer to shoot that way.
The BRNO baLens is available at the usual suspects (B&H, Adorama, etc...) and prices range from $44.95 - $64.95. Sizes range from 52-77mm. If you wish to purchase one or more, please support this site by clicking on the B&H link to the right and order from there.
After the initial sweep of Day One, Days Two & Three afforded me the opportunity to calmly peruse the smaller booths to see what gems I could uncover. Here are some of the highlights:
Animoto: Animoto is a web product that converts your images into a professional video slideshow complete with music. Free accounts are available but are restricted to making 30 second clips. Professional and Business accounts are available for a fee and allow the creation of longer clips and downloadable DVD quality video.
I was able to create the clip below with images that I uploaded to my Flickr account. Many other online galleries are supported or you can upload images directly to Animoto. Animoto offers a large library of music to use as soundtracks or you can upload your own. The software on their site then analyzes the video and the music and creates a professional looking slideshow in minutes. The video can then be emailed, embedded, downloaded, posted to YouTube, mailed to your iPhone or (for a fee) upgraded to hi-res for DVD playback. Very slick. I plan on using this a lot. Click on the "Get Animoto" link to the right and get a $5 discount on an All Access Pass (normally $30/yr).
Arca Swiss: Makers of view cameras used by legendary photographers like Ansel Adams, Arca Swiss was on hand demonstrating their R-series technical cameras. Arca Swiss also makes ballheads and mounting clamp systems for view cameras. High quality stuff.
Interestingly enough, the R3 (pictured above) is really just a high precision metal plate with a gearing system that allows the photographer to tilt/shift the camera’s lens to correct for distortion. The R3 can mount any medium format film or digital back and is a scale focused rangefinder.
Bibble: Eric and his team from Bibble Labs were on hand demonstrating the as yet unreleased Bibble 5. Bibble started out as a very fast RAW file converter, but with version 5 adds more speed (up to 40x faster than version 4 – and version 4 was the fastest converter on the market already), digital asset management, and a host of adjustment tools. Based on my own workflows, I will rarely have to leave B5 to produce finished images. Even more amazing is the level of multi-threading. Eric demonstrated B5 running on a 16-core machine, submitting a batch of 116 images for conversion and completing the job in a shade over 19 seconds. Unbelievable.
BRNO: Jim over at BRNO LLC always hated to have to carry around a gray card, white balancing gadget or have to hunt down something or someone wearing white at his photo shoots. One day he forgot his white balance card at a wedding where the bride wore red. It was while he was in the midst of preparation for seppuku when he hit upon the idea of combining a white balancing device with a lens cap. Thus the baLens (pronounced "bah-lenz") was born. Seriously, this is one ingenious idea. Just keep the lens cap on, point your camera at the light source, snap a pic and DING! you have a proper custom white balance shot. Unlike similar products, the baLens replaces your existing lens cap a thus does not become an extra widget to have to drag around. The white bit in the center is replaceable and there are warm and neutral versions included with each baLens. Jim expects the baLens to become available around early December. HP Marketing will be distributing in the States, Amplis Foto in Canada, and Etsumi Co. Ltd. in Japan. The product will be retailed by the usual suspects: B&H, Adorama, Calumet, Samy's and other specialty stores.
Canon Printing Systems: Canon had their ImagePROGRAF printers on hand and they were truly a site to behold. Ranging from the diminutive iPF5100 (17" wide) to the monstrous iPF9100 (60" wide), Canon ImagePROGRAF printers operate using a 12-ink system (Cyan, Photo Cyan, Magenta, Photo Magenta, Yellow, Black, Matte Black, Red, Green. Blue, Gray, Photo Gray) including regular and Matte black inks with auto-switching between the two. Like other printers in this class, Canon's Lucia inks are rated at over 200 years of lightfastness. Prices start around $1995 USD for the iPF5100. The iPF5100's ink tanks are 130ml each which is good because the whole set costs around $840 USD.
Needless to say these are large format printers so don't expect to be printing 4x6 snapshots on them. The iPF5100 is actually capable of printing 17" wide by 59 feet! That's one hell of a panorama.
Dymo: King of the label printer, Dymo was present to show off it's DiscPainter. This is a dedicated USB inkjet printer for printable CD's and DVD's. The DiscPainter uses RadialPrint Technology, imaging the disc label on the spinning disc from the hub out. Remember SpinArt? This is the same thing except it's computer controlled. It's very fast, imaging a whole disc in a couple of minutes.
The unit uses a single tricolor ink cartridge so when you run out of one color you have to replace the whole thing. The DiscPainter is PC/Mac compatible and can print on matte, glossy and silver printable discs.
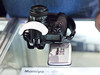
Gary Fong: Mr. Fong is a specialist in diffusion. He makes various inexpensive gadgets for you to strap on to your flashes is order to soften their effect and cut out harsh shadows and "red eye". "Red eye" is caused when a high speed electronic flash is fired close to the focal axis of the lens and directly in the face of the subject who is standing in dim light. The dim light causes the subject's pupils to dilate and the flash's extremely short duration (as little as 1/20,000th of a second) and high intensity light is then reflect off the retinas. This is the source of the "red eye" effect in humans ("green eye" effect in animals). By diffusing the light and softening it, Gary Fong's devices help eliminate this. They also remove the harsh shadows and color draining effects of direct flash.
The device shown in the photo is The Puffer. This retails for under $20 and works with any built-in pop up flash unit. While it does greatly reduce the effective distance of this flash, it transforms the nearly useless built-in flash into a light source eminently suitable for parties and intimate occasions where a larger flash gun would be awkward to manipulate. You can purchase these and other flash diffusers from Gary Fong's website and from dealers like Ritz and Wolf Camera.
Hasselblad: Founded in 1948 by Victor Hasselblad, the camera that bears his name is one of the most prestigious names in photography. A long time champion of medium format cameras, Hasselblad has kept pace with the digital revolution and is currently on its 4th generation digital medium format camera.
Unlike other players in this market, Hasselblad has opted for a systemic approach to digital medium format with its H-System. The H3D-II cameras are only capable of accepting Hasselblad made lenses, viewfinders, adaptors, accessories, teleconverters, and digital backs. While this practically eliminates third-party lenses and components, it does allow Hasselblad to tightly control the integration of all of the parts that make up this system. Think of them as the Apple of medium format.
One new component added to the mix is the HTS 1.5 Tilt/Shift Adaptor. Tilt/Shift lenses are not a new idea. Practically every major camera manufacturer has two or three models in their harem of lenses. The problem lies in the focal plane shutter mechanism used by those cameras. The tilt/shift mechanism must, by design, physically separate the front half of the lens from rear half. This decoupling of the halves of the lens prevents the use of autofocus motors. Hasselblad, by electing to use a central shutter mechanism (where the shutter is housed in the lens along with the electronically controlled aperture and autofocus motors), Hasselblad's HTS 1.5 adaptor allows the use of up to 5 different lenses as tilt/shift lenses and the transmission of control signals to the lens' aperture and shutter via pass-through contacts and still retain autofocus capabilities. Look for a future review of this camera system.
Hoodman: Hoodman manufactures accessories for digital cameras including right-angle viewfinder adapters (shown), memory cards, and viewing loupes. This last product is an interesting departure from their original product: a popup shade for digital SLR LCD screens. Hoodman has discarded this design in favor of the hooded loupe they now make. I personally use a Delkin PopUp Shade on the rear LCD of my D300 and I am quite pleased with it. In defense of the hooded loupe approach, Hoodman's version can magnify the image up to 3x without zooming on the cameras' display. Many photographers prefer the hooded loupe approach, I myself don’t need more things hanging off of my neck.
M-Rock Camera Bags: Newcomer on the camera bag scene is M-Rock. Stylishly designed and affordable, M-Rock bags securely carry your gear and look good doing it too. Bags range for tiny belt pouches for your point-and-shoot camera all the way up to ergonomic rolling backpacks capable of carrying up to two pro DSLR bodies and a stash of lenses + gear.
That's the end of Part One. Part Two will be up shortly.
This blog is here as an outlet for me to discuss topics and technologies outside the scope of my other websites. Photography will be a focus as well as current events in the world of tech. Tune in frequently.
 Lens Cap. This clever gadget combines a custom white balance tool with a lens cap. The practical offshoot of this combo is that you have one less bit of kit to have to haul around in your camera bag.
White balance refers to the color of the light being used to illuminate the subject. Even though the light may look white to our eyes, it may have a color cast to it ranging across the entire visible spectrum (and a little bit beyond depending on the camera used). The color of the light is referred to as the color temperature and is expressed as a numeric value in degrees Kelvin.
In the world of film, this is handled by the chemistry of the film used - daylight film for general use, tungsten film for studio lights, IR/UV film for special purposes.
In the digital world, a special sensor in the camera tries to determine the color of the light being used. Modern DSLRs have vastly improved Auto White Balance (AWB) sensors but they are not perfect and can be fooled by mixed lighting environments. Modern DSLRs also provide several preset white balance settings as well as a method to input color temperatures (in degrees Kelvin) directly or to take a custom measurement before shooting.
However, if one is shooting in RAW mode (and you should be), RAW conversion software will allow to make white balance corrections easily afterwards. The only time this does not work is if the target has no white/gray/black on them for the software to get a reading. In this case, one must take a custom white balance reading by using a white/gray card and taking a test shot.
So now we have two schools of thought on this matter:
* Shoot AWB and fix in post.
* Shoot with custom white balance and get it right in the camera (mostly).
On the surface, the "Fix it in post" school of thought seems to be the logical choice except in those cases where there is no white/gray/black to take a reading off of.
Or is it?
Lens Cap. This clever gadget combines a custom white balance tool with a lens cap. The practical offshoot of this combo is that you have one less bit of kit to have to haul around in your camera bag.
White balance refers to the color of the light being used to illuminate the subject. Even though the light may look white to our eyes, it may have a color cast to it ranging across the entire visible spectrum (and a little bit beyond depending on the camera used). The color of the light is referred to as the color temperature and is expressed as a numeric value in degrees Kelvin.
In the world of film, this is handled by the chemistry of the film used - daylight film for general use, tungsten film for studio lights, IR/UV film for special purposes.
In the digital world, a special sensor in the camera tries to determine the color of the light being used. Modern DSLRs have vastly improved Auto White Balance (AWB) sensors but they are not perfect and can be fooled by mixed lighting environments. Modern DSLRs also provide several preset white balance settings as well as a method to input color temperatures (in degrees Kelvin) directly or to take a custom measurement before shooting.
However, if one is shooting in RAW mode (and you should be), RAW conversion software will allow to make white balance corrections easily afterwards. The only time this does not work is if the target has no white/gray/black on them for the software to get a reading. In this case, one must take a custom white balance reading by using a white/gray card and taking a test shot.
So now we have two schools of thought on this matter:
* Shoot AWB and fix in post.
* Shoot with custom white balance and get it right in the camera (mostly).
On the surface, the "Fix it in post" school of thought seems to be the logical choice except in those cases where there is no white/gray/black to take a reading off of.
Or is it?