Apple's decision to not offer a Blu-Ray drive as an option on the Mac Pro has been frustrating many users for quite some time. PC users have long enjoyed the expanded storage and high-definition content available on the new format.
This has not stopped enterprising third parties from adding Blu-Ray drives to their systems. The good news is that Apple decided to make the Mac Pro easy to upgrade in the field. The bad news is that Apple chose to use the more traditional (and less expensive) IDE (PATA) interface for it's optical drives. PC motherboard OEMs are cramming more and more SATA ports on their boards, so optical drive makers are switching to SATA as well. This makes it hard to find IDE based Blu-Ray drives.
Enter the gang at Cooldrives.com with their SATA-PATA adaptor board. This little gem plugs into the back of the SATA Blu-Ray drive and allows you to easily install it in the Mac Pro. Apple provides a complete and thorough set of instructions on how to swap out optical drives on the Mac Pro, so I won't cover those here.
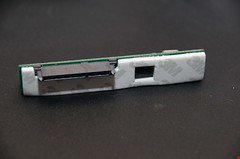

SATA and PATA sides of the Cooldrives adaptor board
Here are the steps to prepare any SATA optical drive for installation in the Mac Pro using Apple's instructions.
Tools needed:
- Large paperclip
- Small Phillips screwdriver (or large jeweler's screwdriver)
- Tweezers (optional)
Instructions
- Take the large paperclip and unfold one side of it.
- Insert the unfolded end of the paperclip in the front of the optical drive to manually pop out the drive tray. (Please refer to the drive manual to see the exact location of the ejection port.)
- Turn the drive over and (using your fingers only) pry the front plate off of the drive tray. The plate is usually snapped on the front of the tray, so carefully pry the tabs away from the tray and push down. The front plate should slide off intact.
- Take the Cooldrives adaptor and peel the cover off of the double-sided tape.
- Line up the SATA connector with the SATA port on the optical drive.
- Press the Cooldrives adaptor gently but firmly onto the optical drive.
- If you are installing the drive as the Mac Pro's primary optical drive (as I did), you have to pull the jumper off of the back of the adaptor board. Use your fingers or the tweezers to pull the jumper. If the drive is going into the secondary slot, you won't have to mess with the jumper. (Apple usually expects optical drives to be set to "Cable Select" but that is not an option on the Cooldrives adaptor.)
Your drive should now look like this:
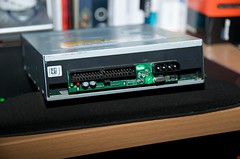
Front and back views of prepared optical drive
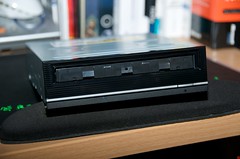
Follow the Apple installation guide and you will be able to mount the drive easily in your Mac Pro. I used an LG GGW-H20L which supports BD writing, HD-DVD reading, multi-layer discs, DVD's, CD's and includes BURN-Proof and Lightscribe. You can purchase this drive from Performance PC's. Tell Hank that I sent you.
Please keep in mind that Blu-Ray/HD-DVD playback is not supported in any Mac OS yet (the jury is still out on Snow Leopard) so you won't be able to play commercial discs. You will be able to burn BD discs for playback on set top players and for data storage. Roxio Toast Titanium 9 offers BD support via an optional plugin.